Building Up the Willow Line

How are you doing on this lovely Saturday. Well, it’s Saturday here when

Willow Bottle Holder Pattern by Divine Debris
Willow Bottle Cozy Pattern by Divine Debris

I’m at but it might not be where you are. Either way, I hope which ever day it is where you are is delightful. Here I’m hoping to accomplish some much needed house work and get some patterns finished up as well as work on a new “secret” pattern that I’m not sure about still. Don’t you hate that? When you’re working on a pattern and you’re not entirely sure you like how it’s working up but you want to continue working on it? Because you won’t know if you’re happy about it or not until it’s done. That’s where I am at with this pattern I have floating around in my head.
I digress… I actually wrote this pattern up last week and had it all ready to go, but I didn’t have the pictures done. Sometimes the taking and editing of pictures takes me forever to get around to. Not because it takes so long, but because I won’t sit down and get to it. Also, the posting. I’m not consistent with the posting. I’m more content to sit and work up a pattern while watching Grey’s Anatomy reruns, all the other stuff is hard. Ok, not hard, but not as fun. :p
As the title says I’m expanding the Willow line some more, with a bottle cozy.  I was inspired by other designers posting adorable pictures of their bottle cozies and I genuinely said, “I want to make one.” So I did. And you can too, it’s very easy.

Materials:
*US G (4.25mm) crochet hook
* 1 – 2 oz worsted weight yarn
*3 different colors (although you can do more or less it’s entirely up to you) I used Loops and Threads Impeccable
* Tapestry needle

Gauge: 
4.5″ x 4.5″= 19 dcs x 9 rows

Willow Bottle Holder Pattern by Divine Debris
Willow Bottle Cozy Pattern by Divine Debris

Terms/stitches used:
*St: stitch
*Slip st: slip stitch
*Ch: chain
*Sc: single crochet
*Spike sc: spike single crochet
*Hdc: half double crochet
*Spike hdc: spike half double crochet

Note:
*If you would like to make this pattern taller, just keep adding rows before you get to the handles.
*You will need to know how to sc into the back loop only for this pattern.
*This pattern is written using 3 colors, listed below as colors A, B, and C. You can add more or fewer colors to this pattern if you would like.
*Instead of fastening off between color changes, you can just drop the yarn for the color you’re not longer using and pick it back up again when it comes time to use it. This will cut down on the amount of ends you will have to weave in, but the inside might not be as clean as some people would like. It’s your decision on this, I like to drop the yarn and pick it back up because I hate weaving in ends (unless it’s a gift and then I’ll clean it up).
*This pattern is worked from the bottom up. You complete the base and then move on to the cylindrical sides and then finish with the handles, all in one piece. This is done row by row with a slip st at the end of each row.

Finished product dimensions:
*Height: 13.5”
*Diameter: 5.25” – 5.5”

Willow Bottle Holder Pattern by Divine Debris
Willow Bottle Cozy Pattern by Divine Debris

To get this pattern visit DivineDebris.com

Diana Pot Holder/ Hot Pad

Diana hot pad/ pot holder pattern by Divine Debris

In April I won a giveaway from Salena Baca Crochet for a bag of mish-mash cotton yarn. This was super cool, as I’m not used to winning things all that often, but then I didn’t know at all what to do with all the cotton yarn. My first instinct was to make pot holders! I mean, of course you make pot holders when you have cotton yarn, right? So as soon as my brain when there I decided to write up a pot holder design, based on one of my most recent patterns, the Diana Cowl. For the hot pad I used a US G hook and for a pot holder I used a US I hook, because for a hot pad I want very little space between the stitches but for a pot holder that’s less important. Regardless, it’s the same pattern just a bit different – the hot pad requires more stitches to get to nearly the same size. Add it to your Ravelry here. Pin it here .

Diana hot pad/ pot holder pattern by Divine Debris

Pattern:

US G (4.25) or US I (5.50) crochet hook
1 – 1.5 oz cotton yarn
Tapestry needle

Stitches used:
Ch: Chain
Slip st: Slip stitch
Sc: single crochet
Hdc: half double crochet

Diana hot pad/ pot holder pattern by Divine Debris

Notes:
This pattern is a easy to customize- add or subtract sts in groups of 2 to make it larger or smaller.
You will need to know how to work into the third loop of a hdc for this pattern.

Finished measurements:
Hot pad: Height: 6.75″, Width: 6.75″
Pot holder: Height: 7.25″, Width: 7.25″

Diana hot pad/ pot holder pattern by Divine Debris

To get this pattern visit DivineDebris.com

Leah Bracelet

Leah Bracelet pattern- a free crochet pattern by Divine Debris

Hello! How are you doin’ on this lovely Thursday? I’m alright, multitasking. I’ve got my Chloe Cowl scarf testing, which seems to be going well and hopefully it’ll be out sometime next week. I’m finishin’ up my giveaway offerings for Mad Mad Mes rainbow themed giveaway- I’m giving a rainbow Leah bracelet, a bib rainbow necklace, which I’ve thought about writing the pattern up for but I’m not sure if I should, and a rainbow Heather headband. Also I’ve got a shawl/wrap pattern I’m working on that will be ready to test soon. I have all the fun, right?  Unfortunately, I’ve had a hard time shaking that post vacation thing, where I’m not ready to get moving and be productive. It’s been quite annoying, really. But I’ll be ok. It was a good vacation.
So, anyway, I designed the Leah bracelet last month and meant to post it as a free pattern some time ago, but I didn’t sit down and write out the pattern until I worked up the rainbow version for the giveaway, for the ones in the pictures here I just created ’em from memory. Actually, when I sat down to make the rainbow one I had to frog it, after it was finished, because I realized I did it wrong. Ha! It’s not a difficult pattern, you just need to be sure you’re working into the same stitches and keep an even tension throughout the chain into chain rows. It gives it great texture. I’m thinking about making a necklace, a headband and a scarf with this pattern. My mind is always going, I just wish I knew where.
And for the pattern:

Leah Bracelet pattern- a free crochet pattern by Divine Debris

Materials:
*2.25mm crochet hook
*Size 10 crochet thread (in as many or as few colors as you would like)
*1 or 2 buttons
*a needle for weaving in ends

Notes:
*This bracelet is worked in 3 parts. The first is the main body, which is composed of the sc & ch/slip st rows. The other two parts are on the ends of the main body, just scs into the ends of the sc rows.
*Try to maintain an even tension in the chain into chain sections, as too loose or too tight might be noticeable in the finished outcome- but that might not be a bad thing if you want the individual rows to have a lot of movement independent of each other row. You’re call, really.


You can find the pattern for this bracelet here on the new blog!

Leah Bracelet pattern- a free crochet pattern by Divine Debris


Wow, the Weather Changes…

Diana Cowl, a free pattern, by Divine Debris

Update: You can download this pdf here. So, I’ve been having tons of fun with super fine yarn, mostly because it’s light weight and

looks so delicate when worked up (like my Imogene hat). However, because the weather here took a very cold turn, I pulled out some heavier weight yarn and made another nice close fitting cowl. You may have already seen this picture on Instagram.

Introducing the Diana Cowl:

It’s super simple, you may love it, especially if you like textured scarves. I used Vanna’s Choice for this but you could also use a worsted weight yarn for this as well. 😀 I’m sure it’d be lovely.


Diana Cowl, a free pattern, by Divine Debris

Materials:

US J ( mm) crochet hook
3 – 3.5 oz medium weight yarn
Tapestry needle

Gauge:
5” x 5” = 8 rows x 17 DCs

Diana Cowl, a free pattern, by Divine Debris

Terms/stitches used:
Ch: chain
St: stitch
Sc: single crochet
Hdc: half double crochet

Notes:
-You will need to know how to work into the third loop of the hdc.
-The ch 1 on the beginning of the hdc rows does not count as a stitch and helps to keep the seam from traveling.

Diana Cowl, a free pattern, by Divine Debris

Finished product dimensions:
Height: 5″ – 5.5″
Diameter: 13″ – 13.5″

To get this pattern visit DivineDebris.com

Starting something new

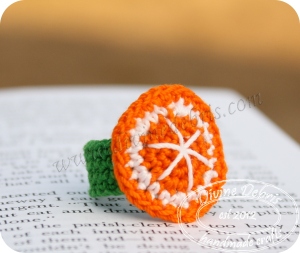
Free orange crochet ring pattern by Divine Debris
Orange crochet ring pattern by Divine Debris

So a couple of weeks ago I was talking with a friend about what to do with the bright orange crochet thread we both have bought. I used mine to make my pumpkin ring and earrings but I honestly really haven’t had much call for it since Halloween / the Fall ended. However, as I was telling my friend, as I laid in bed listening to my husband snore ( it’s not a secret although he might not care for me to share it with the internet) I had an idea about how to use the orange thread before Halloween rolled back around. Citrus fruit! Specifically, make items that look like slices of an orange. Wouldn’t that be super cute? I thought so as I tried to fall asleep and I hoped I would remember when I woke up in the morning.

I did and the first thing I decided to experiment with is making another crochet ring. As you know I do love making crochet rings, I’ve made a Willow version, a Brittany and a heart in addition to my pumpkin ring mentioned earlier,  so this was very natural and simple to think of.  To make one of your own you’re going to need orange size 10 crochet thread, white size 10 crochet thread, a 2.25 mm crochet hook, and a needle that is big enough for you to weave the thread with. You may also want another color for the band for your ring, I used green this time in a departure from my heart and pumpkin rings.
Before you begin you might want to jump over and look at Needle Noodles’ tutorial on how to change colors in the round without making it look all icky. I must admit I’m not great at changing colors in the round and not making it look terrible, but this tutorial has helped a lot.

For the band I crocheted 25 sts and slip stitched the last st into the first to create a ring:

Orange crochet ring pattern by Divine Debris

Rows 1 – 4 or 5: (you can make the band as tall as you would like) ch 1, sc into each st around, slip st into the beginning sc to secure – 25 scs
For the orange:
Row 1: Create a magic circle: ch 1, sc six times into the circle, slip st into the first sc to secure- 6 scs
Row 2: Ch 1, sc twice into the same st as join and into each st around, slip st into the first sc to secure – 12 scs
Row 3: Ch 1, sc twice into the same st as join, sc into the next st, *sc twice into the next st, sc twice into the next st,* repeat from * to * until the end of the row, slip st into the first sc to secure – 18 scs
Change to white thread: Row 4: Ch 1, sc twice into the same st as join, sc once into the next 2 sts, *sc twice into the next st, sc once into the next 2 sts,* repeat from * to * the rest of the way around, slip st into the first sc to secure – 24 scs (fasten off with this color)
Change to orange thread: Row 5: Ch 1, sc once into the same st as join and into the next 2 sts, sc twice into the next st, * sc into the next 3 sts, sc twice into the next st,* repeat from * to * the rest of the way around, slip st into the first sc to secure – 30 scs (fasten off with this color)Orange crochet ring pattern by Divine Debris
*Note: You could just do a sc row around row 5 if you would like, this will make your final product look more round but it might make the edges curl a bit. Your choice.

Details:

I didn’t measure the white piece of thread I used before I addedOrange crochet ring pattern by Divine Debris the details on the ring, however I would say it’s was about 3″ – 4″, it’s better to have it too long than to have it too short. To create

the orange sections, so to speak, you want to start on the back side (the opposite side of the one that has been facing you as you’ve created your orange), bring your threaded needle through the first sc from the seam on row 3, then go through the center of the of the magic Orange crochet ring pattern by Divine Debriscircle, skip 2 sts on row 3 and draw your needle through the next st on row 3 and then through the center of the magic circle again. You’re going to

continue this pattern the rest of the way around your orange. You are going to want to pull the thread tight enough that it doesn’t sag but not so tight that it distorts your orange. Don’t Orange crochet ring pattern by Divine Debrisworry about them

moving because when you weave in the end from the magic circle it will hold the thread pieces in place in the center. When you get all the way around your orange you will come back through the same stitch you began in, the first one of row 3. Weave in your ends following this.

To secure the orange to the band I just used Fabri-Tac but you can sew them or use a glue you’re sure won’t change the color of the thread- I’ve had super glue change thread color before so I wouldn’t recommend it here.

So, tada! There you go. I hope you like this little ring. I’ve got a couple more citrus based ideas that I’m going to work up in the future and get back to you. You can add this pattern to your Ravelry queue/favorites here or Pin it here.

As always, take care and I will chat at you another day.

You can find this post linked up to Oombawka Design’s Link and Share Wednesday and Moogly and Petals to Picots Hookin’ on Hump Day.

Just stopping by for a chat on Thursday

So earlier this week I posted about my experiences with wool dryer ball creation, which I love by

Ruth Scarf pattern by Divine Debris

the way. Well, now I’m back to tell you about the newest pattern I released, the Ruth Scarf.
It’s a really simple scarf that had a lot of texture; it’s also a lot of fun if you ask me.
Now, because this scarf is so simple and I designed it to be long but it’s not quite long enough to be a true infinity scarf and not short enough to be a cowl scarf, I included the multiple information in the pattern. This way you can pretty much do up this scarf as you would like. In short, this scarf is here for you to do adjust as you would like and make unique each time you create it. 😀

Ruth Scarf Pattern by Divine Debris

Also to celebrate that the Ruth Scarf is released, the Ruth Hat is on sale for $2.10 as well.

I also wanted to use this post to talk about how I’m not sure I know what else to do with my little crocheting endeavor. I’m not sure I’m all that good that this, perhaps it’s just how I’ve been feeling down lately. I just don’t know what to do. I don’t know where to go next. Ugh~ I just don’t know what’s going on in my head at the moment. I want to get better at this, some how. If you have any suggestions on what to do, I would very much love to hear them. 😀 Because I just feel like a jumble of no ideas and

Ruth Scarf pattern by Divine Debris

insecurities. Some weeks I think about giving up and then I don’t want to and it all goes around.

You can find this entry linked to Hookin’ on Hump Day 88.

Christmas Vacation Is Over

Oh, it was great while it lasted but I must finally admit that my Christmas vacation is over. I began when my husband got home from deployment and ended a week or more ago but I’ve been putting so much off it’s not even funny. I’ve been sitting on some designs I need to get written up and tested, I didn’t make the post about the wonderful dryer balls I made before Christmas and I want to ask about what I should be working on next. I’m not sure where to go from here. I’m under crochet-joed or something because I just can’t think up my next design idea. I also bought some Loops and Threads Woolike but I don’t know what I want to do with it. A shawl? A shrug? A scarf that’s light for the Spring? I just don’t know! What do you like to do with this size/type of yarn?

Ruth Hat Pattern by Divine Debris

I did finally release my Ruth Hat design! I got this hat tested before Christmas even happened and then I didn’t do anything with it because my husband got home and I was too focused on how much I missed him. 😀

So, anyway, here’s the newest hat. I’ve been wearing it all over when I went out for almost the last month. I definitely like the slouchiness, but then again I love that style. Oh! And to celebrate the release of the Ruth hat I’ve got the pattern on sale for 40% off, as well as all the other hat patterns on my site. 😀 I would love if you added it to your favorites or queue on Ravelry too, if you’re so inclined.
Beginning on Friday I’m going to host a giveaway for the Ruth hat on my Facebook page. It’s going to be a simple pin it type of deal.
I’m going to try to make sure I don’t leave so much time between this post and the next one. 😀 Currently I’m testing another hat pattern that will also be getting a matching cowl soon, so I’ll be back soon to talk about the design.
Until then. Have a good one!

Tis The Seasons for snowflakes

I have been in the best mood the last couple of weeks. I’m working on tons of patterns, having fun doing it, and just throwing together some fun accessories to wear to work. I’m also enjoying school. 😀 I have this assignment where I have to watch Pushing Daisies, the wonderful gone too soon show from like 6 years ago, to analyze it for it’s use of math and then write a paper on that. Sounds fun, right? Tedious, sure, but still enjoyable because Lee Pace. *growl* Whoa, got off topic. Ha.

Crochet snowflake necklace pattern by Divine Debris
Crochet snowflake necklace by Divine Debris

Anyway, want a pattern for a fun snowflake themed necklace that you could probably wear until February or later depending upon where you live?
You’re going to need a US 2.00 mm crochet hook and 2 colors of size 10 crochet thread, I used Aunt Lydia’s in light blue and white, I’d say less than a full oz.

To get this pattern visit DivineDebris.com

Willow hat 2.0

I like the Willow line, which is obvious because I keep adding to it. I just think that the

Willow Hat 2.0, a free crochet pattern by Divine Debris

alternating spike sc and sc can add a lot to a pattern without making it overly complicated. However, to make things a bit more complicated, this new Willow hat features a triangle accent piece. Would you call it a triangle? That’s what I have it labeled as in the pattern but it seems wrong some how. I don’t know, I think triangle works though. Sorry, thinkin’ out loud. 😀

Anyway, I’m updating to introduce you to the newest member of the Willow collection, the Willow Hat pattern 2.0. It’s 2.0 because I have the previous Willow hat, which I love and think looks adorable, but I wanted something a bit sassier. Sure, there’s the Willow Sack Hat but that’s not quite what I was in the mood for the day I made this hat. Actually, I was going to originally call 2.0 the Sassy Willow Hat pattern but because I think the hat itself is unisex, I didn’t want to alienate men from wearing it. Not that I think all men wouldn’t want a hat called “sassy” but I think it might discourage some people from it. I don’t know.

In the end I think that hat is adorable and fun. I’ve already gotten a commission for one, in black with orange and gray.

WillowHat 2.0 in black by Divine Debris

I think it turned out pretty nice, even if black yarn makes me nervous because it shows every fuzz and bit of dust that you’ve had near in ever. *sigh*

Anyway for this pattern you will need 3.5 oz, all together, of yarn, with small pieces of two different contrasting colors, and a US I crochet hook.

You can access the pattern on my website, either reading it off the page or downloading your own pdf file. Please, do not hesitate to let me know if you see anything wrong with the pattern either here, at info@divinedebris.com or on my Facebook page.

You can add the pattern to your Ravelry queue here and pin it for later, here.

The next addition to the Willow collection will be the boot cuffs. I’ve got the pattern nearly

Willow boot cuffs by Divine Debris

finished, I just need to be sure the sizing is correct. The alternating sc and spike sc make the upper part larger than it was in my Eva boot cuffs and it’s proving to be a bit of a pain in my neck. However, as you can see in the picture to the right, the look is quite nice. I did this pair in Loops and Threads Impeccable in gold, teal and soft taupe. I think if you wanted you could do 5 different colors or add another two rows to the top in the first color. 🙂 I love to encourage people to experiment with my patterns.

Until next time, have a good week(s)/weekend(s). I’ve got tons to do in my non-crochet life, like paint bedrooms and clean the house, before people come to visit toward the end of this month. Oh, I’m tired at the thought of all that. 😀

You can find this post linked on Hookin’ on Hump Day by Moogly and Petals to Picots.

Happy Thanksgiving/Black Friday

I must say that my holiday this year isn’t super exciting. I’ve got homework I’ve been

50% off all crochet patterns on DivineDebris.com

putting off, I’m terrible (I know!), I’ve got to work tonight (U.S. Thanksgiving evening), work tomorrow night and I’m alone. Last night I made a cranberry apple pie with a crumble on top, it’s seriously good. My Thanksgiving dinner consists of turkey breast slices rolled around stuffing, topped with gravy, and baked.

To be honest with you, it’s not that bad. I’m doing ok, maybe feeling a bit lonely but it’s alright.
I’m working a couple of ami patterns for Christmas, as always I have to give my Wendy/Willa a seasonal update. 😀 So keep on the lookout for those in the coming weeks. I’m done with the new Willow patterns I mentioned in my last post, I just haven’t had the time to publish the patterns on my website. I feel like I’m always busy right now. I cannot wait for the holidays to be over. Ha.

Teacup mug hugger sleeve by Divine Debris
Crochet teacup mug hugger sleeve by Divine Debris

I also want to post a mug hugger (on the right) how-to on my website. Have you seen these guys? They’re so cute! I’ve been making a ton of them lately and I’ve sold a few, so that’s neat.

Anyway… I have to go get ready for work and have another slice of pie.
If you’re interested I’m offering 50% off the regular price of any of my patterns Nov 28th – Dec 1st.

If you celebrate or not, I hope you’re having a good Thursday wherever you are.