Building Up the Willow Line

How are you doing on this lovely Saturday. Well, it’s Saturday here when

Willow Bottle Holder Pattern by Divine Debris
Willow Bottle Cozy Pattern by Divine Debris

I’m at but it might not be where you are. Either way, I hope which ever day it is where you are is delightful. Here I’m hoping to accomplish some much needed house work and get some patterns finished up as well as work on a new “secret” pattern that I’m not sure about still. Don’t you hate that? When you’re working on a pattern and you’re not entirely sure you like how it’s working up but you want to continue working on it? Because you won’t know if you’re happy about it or not until it’s done. That’s where I am at with this pattern I have floating around in my head.
I digress… I actually wrote this pattern up last week and had it all ready to go, but I didn’t have the pictures done. Sometimes the taking and editing of pictures takes me forever to get around to. Not because it takes so long, but because I won’t sit down and get to it. Also, the posting. I’m not consistent with the posting. I’m more content to sit and work up a pattern while watching Grey’s Anatomy reruns, all the other stuff is hard. Ok, not hard, but not as fun. :p
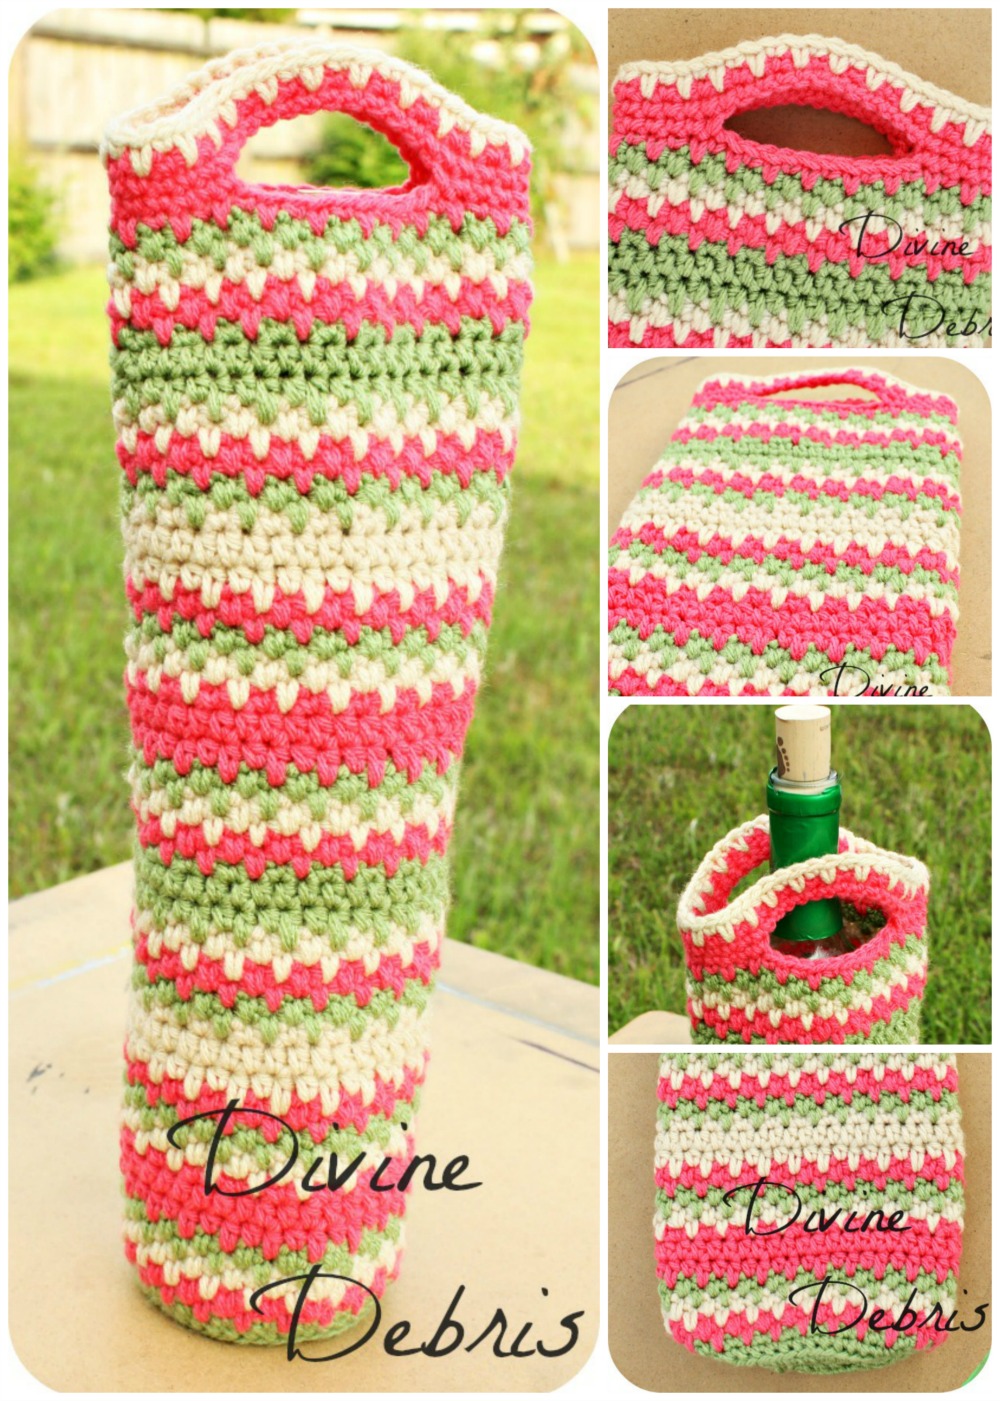
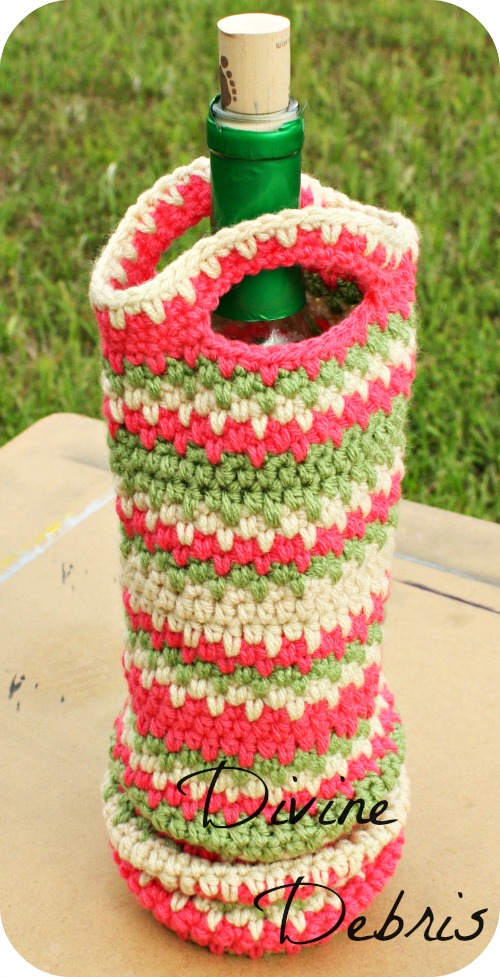
As the title says I’m expanding the Willow line some more, with a bottle cozy.  I was inspired by other designers posting adorable pictures of their bottle cozies and I genuinely said, “I want to make one.” So I did. And you can too, it’s very easy.

Materials:
*US G (4.25mm) crochet hook
* 1 – 2 oz worsted weight yarn
*3 different colors (although you can do more or less it’s entirely up to you) I used Loops and Threads Impeccable
* Tapestry needle

Gauge: 
4.5″ x 4.5″= 19 dcs x 9 rows

Willow Bottle Holder Pattern by Divine Debris
Willow Bottle Cozy Pattern by Divine Debris

Terms/stitches used:
*St: stitch
*Slip st: slip stitch
*Ch: chain
*Sc: single crochet
*Spike sc: spike single crochet
*Hdc: half double crochet
*Spike hdc: spike half double crochet

Note:
*If you would like to make this pattern taller, just keep adding rows before you get to the handles.
*You will need to know how to sc into the back loop only for this pattern.
*This pattern is written using 3 colors, listed below as colors A, B, and C. You can add more or fewer colors to this pattern if you would like.
*Instead of fastening off between color changes, you can just drop the yarn for the color you’re not longer using and pick it back up again when it comes time to use it. This will cut down on the amount of ends you will have to weave in, but the inside might not be as clean as some people would like. It’s your decision on this, I like to drop the yarn and pick it back up because I hate weaving in ends (unless it’s a gift and then I’ll clean it up).
*This pattern is worked from the bottom up. You complete the base and then move on to the cylindrical sides and then finish with the handles, all in one piece. This is done row by row with a slip st at the end of each row.

Finished product dimensions:
*Height: 13.5”
*Diameter: 5.25” – 5.5”

Willow Bottle Holder Pattern by Divine Debris
Willow Bottle Cozy Pattern by Divine Debris

To get this pattern visit DivineDebris.com

Willow hat 2.0

I like the Willow line, which is obvious because I keep adding to it. I just think that the

Willow Hat 2.0, a free crochet pattern by Divine Debris

alternating spike sc and sc can add a lot to a pattern without making it overly complicated. However, to make things a bit more complicated, this new Willow hat features a triangle accent piece. Would you call it a triangle? That’s what I have it labeled as in the pattern but it seems wrong some how. I don’t know, I think triangle works though. Sorry, thinkin’ out loud. 😀

Anyway, I’m updating to introduce you to the newest member of the Willow collection, the Willow Hat pattern 2.0. It’s 2.0 because I have the previous Willow hat, which I love and think looks adorable, but I wanted something a bit sassier. Sure, there’s the Willow Sack Hat but that’s not quite what I was in the mood for the day I made this hat. Actually, I was going to originally call 2.0 the Sassy Willow Hat pattern but because I think the hat itself is unisex, I didn’t want to alienate men from wearing it. Not that I think all men wouldn’t want a hat called “sassy” but I think it might discourage some people from it. I don’t know.

In the end I think that hat is adorable and fun. I’ve already gotten a commission for one, in black with orange and gray.

WillowHat 2.0 in black by Divine Debris

I think it turned out pretty nice, even if black yarn makes me nervous because it shows every fuzz and bit of dust that you’ve had near in ever. *sigh*

Anyway for this pattern you will need 3.5 oz, all together, of yarn, with small pieces of two different contrasting colors, and a US I crochet hook.

You can access the pattern on my website, either reading it off the page or downloading your own pdf file. Please, do not hesitate to let me know if you see anything wrong with the pattern either here, at info@divinedebris.com or on my Facebook page.

You can add the pattern to your Ravelry queue here and pin it for later, here.

The next addition to the Willow collection will be the boot cuffs. I’ve got the pattern nearly

Willow boot cuffs by Divine Debris

finished, I just need to be sure the sizing is correct. The alternating sc and spike sc make the upper part larger than it was in my Eva boot cuffs and it’s proving to be a bit of a pain in my neck. However, as you can see in the picture to the right, the look is quite nice. I did this pair in Loops and Threads Impeccable in gold, teal and soft taupe. I think if you wanted you could do 5 different colors or add another two rows to the top in the first color. 🙂 I love to encourage people to experiment with my patterns.

Until next time, have a good week(s)/weekend(s). I’ve got tons to do in my non-crochet life, like paint bedrooms and clean the house, before people come to visit toward the end of this month. Oh, I’m tired at the thought of all that. 😀

You can find this post linked on Hookin’ on Hump Day by Moogly and Petals to Picots.

New project: crochet rings

Crochet rings by Divine Debris

Hello! How is your May going? I hate that it’s been a month since I updated this blog. I’ve had projects that I’ve wanted to share with you all but I’ve just been so stressed and overwhelmed with school, hubs’ military career(deployments and stuff) and then I’m going to go see my family this coming week because my sister is getting married. It’s super exciting, her upcoming marriage but just getting everything organized before I leave has been a nightmare, mostly because my husband may or may not be deploying to parts unknown (to me) in the meantime. Oh, such is the life of military families. On to funner and happier things. Last weekend I was in a bit of a funk in terms of making earrings so… I decided to try my hand at making crochet rings and guess what, it worked! I think the lil’ buggers are super cute and I wanted to share with you all how I did it.

Willow Ring by Divine Debris

Honestly, it’s really very easy if you’ve got the materials and time. You’ll need a steel crochet hook, I used Boye 2.25 mm sized hook, and crochet thread, I used Aunt Lydia’s size 10 thread. Best way to make some rings is to measure how much thread you’ll need by making a chain around your finger, I chained 24 and slip stitched to secure, creating a ring of chains.

Here’s a pattern for the Willow ring (pictured on the right): Ch 24, slip st to form a ring.

Row 1 – 2: (with first color) Ch 1, sc into each sts around (24 scs)

Row 3:(with second color) Ch 1, sc into first st, spike sc into next st, *sc into next st, spike sc into next st* repeat from * to * the rest of the way around the ring (12 scs, 12 spike scs)

Row 4: Ch 1, spike sc into first st, sc into next st, *spike sc into next st, sc into next st* repeat from * to * the rest of the way around the ring (12 scs, 12 spike scs)

Rows 5 – 6: (with third color) repeat rows 3 – 4.

Row 7: (with first color) repeat row 2 (12 scs, 12 spike scs)

Row 8: Ch 1, sc around (24 scs) Again, you will have to adjust this depending upon your finger size, which will affect the amount of sts you make in a row just be sure to make sure the amount of sts you have is even. Do you like this variation of the Willow series? I think it’s a great way to incorporate different colors and give it a bit of fun style (and your ring can match your hat, if you’re into that sort of thing.) 🙂

Overlay earrings by Divine Debris

Next time I update I hope to be able to talk about some new earrings I have been making, trying my hand at overlay crochet. Here’s a preview: What do you think? I’ve had a lot of trial and error trying to get some overlay crochet going. To be honest, it was driving me freakin’ crazy but I do like the way it has ended up. Anyway, I’ll also have another ring pattern for you all when I return. Take care!   You can find this post on Hookin’ on Hump Day 71 hosted by My Merry Messy Life and Moogly.

Catching up Wednesday: Willow Sack Hat Pattern

Do you like sack hats? They’re kinda cute, if you ask me. I’ve worked on a variation of the Willow hat pattern, but as a sack. I actually

Willow sack hat pattern by Divine Debris

posted this pattern on my website, Divine Debris, some time ago but I didn’t update it here. I’m not really sure, to be honest with you, as to why I didn’t update it here. Laziness, probably. I’ve been in a real funky mood these last couple of weeks- just listless and without motivation to do anything. I’ve got a decent amount of homework due next week and, well, I’ve barely begun to work on it. Alas… it will get done. 🙂 You can add the Willow Sack Hat to your Ravelry que here. You can download a pdf here and the website features a nice, printer friendly, version for you.

To get this pattern visit DivineDebris.com

The NEW Willow Scarf

Remember the last post I made, the one about the Willow hat? It was based on the Willow scarf from last September but, in all honesty it wasn’t as matchy-matchy as I would like it. Enter the Willow scarf 2.0! I’m quite glad that I’m still working on scarves because it’s still snowing around here. I live in the South now, NC in fact, and I cannot believe how much we’re getting around here. It’s insane. Also, it makes people around here not able to drive worth a damn. I mean, seriously, it’s just snow! But the roads are terrible, so of course you can’t blame people for their fears.

Willow Scarf 2.0 by Divine Debris

Materials:

3 colors of worsted weight yarn

U.S. J crochet hook

Tapestry needle

To get this pattern visit DivineDebris.com

Willow hat pattern

Update:  you can download the pdf from my website here and you can add it to your Ravelry queue here.

So, it’s January and I’ve been taking it easy since classes ended and work slowed down. How’s everyone doing? I’ve got one project in the works, it’s called the Roxanne, and it features a scarf and hat of the same style. I really love the pattern but I did something stupid, I worked up the hat but didn’t do as good with writing down the directions as I made it so… uh, I have to try to figure out what I did. Oops. I was watching a movie and in the zone, forgot to write the steps down. It’s ok, I’ll figure it out. 😀

However, I didn’t forget to write down the instructions to the Willow hat. Score or just better planning. Do you remember the Willow rug and scarf? Well this pattern

Willow hat pattern by Divine Debris

is a variation on that sc and spike sc I used on those two other patterns. Here I paired it with the herringbone hdc. If you are unfamiliar with the HBhdc Moogly has a video tutorial that’s very helpful. Speaking of Moogly, my festive winter mug cozies were #3 on the last Hookin’ on Hump Day of 2013.

Materials:

  • 3 colors of WW yarn – one needs to be around an 0z, other less
  • US J crochet hook (6 mm)

Notes:

  • The spike sc is also known as a long sc crochet.
  • Feel free to replace ch 2 at the beginning of the rows with an alternative stitch.
  • The hat is worked row by row with a slip st into first st to secure the row before moving onto the next row.
  • Following the hat body there are two options for the brim in the pattern instructions.

Pattern Instructions:

To get this pattern visit DivineDebris.com

Winter mug cozy patterns!

winter cozies by Divine Debris

Do you like mug cozies? I do. I actually use my cozies for anything I drink from, especially my energy drinks because the cans are super cold. I especially do this because I like to be awesome when I leave the house and I rarely see people with cozies around their Monster cans. 😀

So, for you to enjoy I’m including four patterns that I’ve been working on for a couple of weeks now but I haven’t gotten around to posting because I’ve been so busy! Seriously, everyone, I’ve been so busy that I’m actually putting off reading for homework to make this post. My semester is over on Friday,  which makes me so happy, but I have two more assignments due before then. Bah!

I digress.

Materials:

  • White WW yarn for the snow people and penguin cozies. – you don’t need too much.
  • U.S. I crochet hook (5.50mm)
  • Black WW yarn for penguin & snowman hat.
  • 3 colors of WW yarn for Willow cozy.
  • Color for snowwoman bow.
Snowman cozy by Divine Debris

Snowpeople:
Row 1: Ch 13, sc into second ch from the hook and across 12 scs
Row 2: Turn, ch 1, sc into BACK loop all the way across – 12 scs
Row 3: Turn, ch 1, sc into FRONT loop all the way across – 12 scs
Rows 4 – 7: Repeat rows 2 & 3 twice more
Rows 8 – 20: Turn, ch 1, sc across – 12 scs
Rows 21 – 27: Repeat rows 2 – 3.
Fasten off, weave in the ends.

Finishing:
Using a whip st closing, use back loop and loop on the other side of beginning ch to secure.

I used puffy paint to make the faces on both of the snow people. It was really easy, just make sure while the cap is still on you tap it point first on the floor or something so that you get rid of air bubbles that may make a mess. Draw the eyes, carrot nose and mouth on the flat portion of the snow people cozy body.

To get this pattern visit DivineDebris.com

Willow scarf pattern and life’s constant move forward

Do you remember the Rug with no name I posted last week? Well, it has a name, it’s the Willow Rug, the great name given to me by someone on FB, and it’s available to download from my website. It has been downloaded quite a few times and guess what! Someone posted pictures on Ravelry of their finished version. I can’t really explain it, but I love seeing the finished items that people create from my patterns. It’s just so… so freakin’ awesome!

Anyway, the response to the Willow Rug was so positive that I decided to build on it,

Willow Infinity Scarf Pattern

making a scarf pattern as well. On the right here is a picture of the version of the Willow Infinity Scarf I completed the pdf, which is pretty simple: alternating rows of scs and spike scs. In the pdf I include options to add your own details into the scarf, like working it flat and making a really fun cowl by adding a border and overlapping the ends to secure- which I think I will work up myself because I like the idea.

Here’s the pattern just in case you’re not interested in downloading the pattern:

Row 1: Ch 81, sc into second ch from the hook and into all sts across, slip st to the first sc to secure – 80 scs

  • Note: Before you secure row 1 give the row one twist, this will create a twist in the scarf later on. If you do not want a twist in the finished product, disregard this note.

Row 2: Ch 1, sc into first st, spike sc into next st, *sc into next st, spike sc into next st* repeat from * to * all the way around – 20 scs, 20 spike scs

Row 3: Ch 1, spike sc into first st, sc into next st, *spike sc into next st, sc into next st* repeat from * to * all the way around – 20 scs, 20 spike scs

Rows 4 – 16: repeat rows 2 & 3 over and over again.

What do you guys think I should do next? I don’t know where to go from here…

Hey, I want to include a link to my FB because I’m always developing new patterns and need testers. I feel like I’m overwhelming the testers that have been nice enough to help me out! Ha.

Currently I’m working on the pattern for my Marianne scarf. I worked it up in two colors, tan and soft pink, and I love it. I’m also working on a pattern on how to make it a hooded cowl or a scoodie. Do you guys like scoodies? I don’t think I’m ok with that name, as it seems a bit silly. 😀

In conclusion, Monday school starts. I’ve received all but one of my books and I’m growing a bit nervous. I’ve had the whole summer off, the longest break from school that I’ve had since i went back a couple of years ago. I’ve got a year left, hopefully I’ll graduate in the Spring with my BA… but I see the road that is waiting for me. I see the work, so many papers and the deadlines already haunt my dreams. And I’ve got allergies. Ok, I’m going to stop complaining! Promise. 😀 Hold me to it, k?

You can find this post on Yarn Along and Hookin’ On Hump Day.

Just a simple rug with no name.

Update: You can find the rug pattern on my website here. I call it the Willow rug. 🙂

So we’ve now been in our new house for 2 months, it’s still very exciting sometimes to think about. However, before we rug4moved into the house we had to live in a hotel for a month and that really messed up my crocheting schedule. 🙂 So when we moved in I had a difficult time getting into the habit of crocheting again. I just wasn’t very excited about it or inspired. The first thing, for the most part, that I finished after we moved into the house was this rug. The reason that I wanted to make a rug was to add some fun and personality into the house. A simple rug, like this one, was just what I needed to ease me back into crocheting.

It doesn’t have a name right now but I’ll get one at some point, because I’m going to put a pdf together and feature rug3it for free on my website. As you can see in the picture on the left, it’s a simple spike sc and sc combo. If you want to try it out before the pdf comes out, here it is:

W/ an US M or 9 mm crochet hook and 3 worsted weight yarns:

Row 1: Ch 45, sc into second st from hook and all the way across

Row 2: turn, ch 1,* sc into first st, spike sc into next st* (sc into the same st as the sc in the row beneath this one), repeat from * to * until the end of the row

Row 3: change colors, turn, ch 1, *sc into first st, spike sc into next st,* repeat from * to * all the way across

Row 4: turn, ch 1 *sc into first st, spike sc into next st* repeat from * to * all the way across

Row 5: change colors, turn, ch 1 *sc into first st, spike sc into next st* repeat from * to * all the way across

Row 6: turn, ch 1 *sc into first st, spike sc into next st* repeat from * to * all the way arcoss

Rows 7 – 108: repeat this pattern over and over until you reach row 108. Two rows of first color, two rows of second color, and two rows of third color.

Row 109: with first color: turn, ch 1,* sc into first st, spike sc into next st* (sc into the same st as the sc in the row beneath this one), repeat from * to * until the end of the row

Row 110:  turn, ch 1, *sc into first st, spike sc into next st,* repeat from * to * all the way across

Once you’re done use one of your colors and sc into each st across the top, bottom and both sides, ch-ing twice at the corners.

I hope you guys like the very simple, no name rug pattern.

Also, my next pattern: Siobhanscarf