Bunny Bling!

Bunny Ring Pattern by Divine Debris

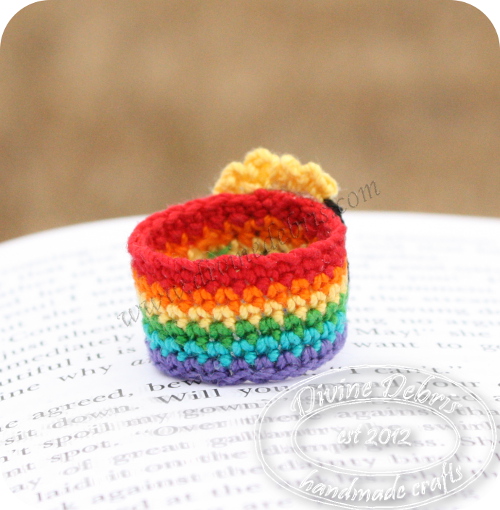
Hello! How are you this fine Saturday? I’m actually on vacation, visiting family in Texas, but I needed to update this blog with the bunny ring that I made last week (which you may have already seen on Instagram or FB). Originally I was going to write this blog before I left but, alas, my time got away from me and that did not get done (not to mention that I found my motivation waning). Anyway, to continue with the ring posts that I made as of late (which you can find here), I wanted to make a ring for Easter. You could wear this ring in addition to the egg earrings I posted about a couple of years ago or even make your own applique from last year’s egg update. Actually, I was thinking that if you made it with worsted weight yarn, you’d have to figure out how many stitches to do, you could make your own little egg holder. How cute would that be? It’d be like a yarn version of one of these.

Bunny Ring Pattern by Divine Debris

Materials:
*US 2.25mm crochet hook
*US 2.20mm crochet hook
*Size 10 crochet thread
*Glue (fabric glue is what I used)
*Puffy paint (optional but makes creating a cute tail easy)
*Needle to weave in your ends

Final measurements: 
*Individual bunnies around just over 1″ in height and .5″ in width
*The band is .5″ in height and just over 1.25″ in width when laid flat.

Bunny Ring Pattern by Divine Debris

Pattern:
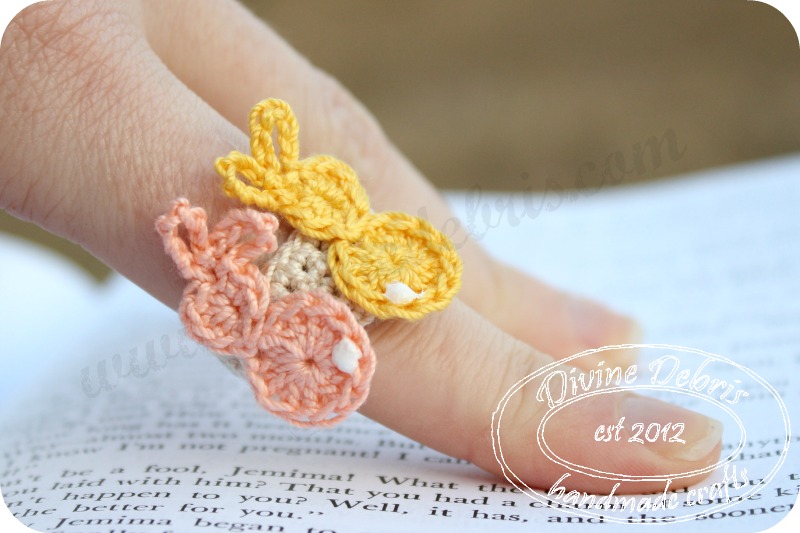
For the bunny itself I used HodgePodge Crochet’s bunny applique pattern (it’s free!). Previously I had made some bunny stud earrings from another pattern I found online but HodgePodge Crochet’s pattern is far superior and the photos are helpful and you can make bunnies that sit back to back (as I did on my ring) without having to think about how to do that. 😀 Seriously, she takes all the guess work out of creating cute bunnies! The hardest part of this pattern might be how tiny and tight the stitches end up when you use the 2.20mm crochet hook. I wanted the band to be less of a tight fit so I used the basic band I’ve used in my Pumpkin and Heart rings.
The bunnies (using the 2.20mm hook): create two bunnies per the instructions on the HodgePodge Crochet pattern, you can do whatever colors you have on hand, and if you want you can make them back to back or facing the same side (crafters choice). If you wanted to use the 2.25mm hook for the bunnies it would be entirely fine, but the bunnies will end up later than you see in the photos.

Bunny Ring Pattern by Divine Debris

For the band (using 2.25mm hook):
Row 1: Ch 25, slip st to form a ring, sc into each st around, slip st into first sc to secure – 25 scs
Rows 2 – 5: Ch 1, sc into each st around, slip st into first st to secure – 25 scs
Fasten off, weave in ends.

Honestly, I think I should have made the band green, which would have worked for the Easter theme of the ring. A neon green would have looked rather adorable, if you ask me, because it would evoke thoughts of that bright green grass that you so often find in kids’ Easter baskets, or at least I did when I was a young-in. After all your ends have been woven in, use the puffy paint to create little fluffy tails. You don’t have to do this if you don’t want to, you could glue a bit of yarn or something too and achieve the same effect. Once the puffy paint (or whatever you used to create the tail) has dried, glue the bunnies to the band. I always use fabric glue when I glue appliques and such onto ring bands, because I have found glues like Super Glue can discolor the thread when used. Just let everything dry and enjoy your new ring! Oh, and if you use the pattern to make an egg holder, let me know in the comments how it turns out.

Leah bracelet by Divine Debris

So, there you have it! A super easy, and I say adorable, crochet bunny ring. Honestly, the bunny pattern by HodgePodge Crochet is so useful, you could make bunnies by the pound with no problems at all.  I’m going to go and enjoy the first day of my vacation that isn’t going to be spent in a car (we drove down here) and I will be back, probably next week some time, to bring you the pattern for my Leah bracelet (on the right).

Take care! Oh, and if you have any ideas on what sort of patterns you’d like to see me post here, just leave a comment and I’ll see what I can do. 😀

Pot of Gold Ring

Hello! I know that on my last post I said that I was going to update this blog here with a pattern for a pot of gold ring,

Pot of Gold/Rainbow ring by Divine Debris

just in time for St. Pat’s Day, and here I am, squeeking in before the day itself. Ha. Actually, I’ve been wanting to do a lot more when it comes to crochet lately but I’ve had some problems with motivation and depression. I’m just going to try to keep my chin up and continue moving forward. In fact, I’m going on a vacation at the end of this month to go visit some family and I think that’s going to help. 🙂

Not that you’ve got past all the yada yada that I was throwing out there, do you still want the pot of gold ring? 😀
I made this pot of gold ring and placed it on top of a rainbow ring base because I thought it would look adorable (side note: I was right :p). You can definitely use whatever colors you would like and perhaps even make this with worsted weight yarn and a size G hook and make it a larger applique. Again, check out this link on how to change colors in the round to help with your seam if you are worried with that.

Pot of Gold/Rainbow ring by Divine Debris

Materials: 

Size 10 crochet thread
2.25 mm crochet hook
glue
a needle to weave in your ends

Pattern:

Pot of Gold/Rainbow ring by Divine Debris

To get this pattern visit DivineDebris.com

Starting something new

Free orange crochet ring pattern by Divine Debris
Orange crochet ring pattern by Divine Debris

So a couple of weeks ago I was talking with a friend about what to do with the bright orange crochet thread we both have bought. I used mine to make my pumpkin ring and earrings but I honestly really haven’t had much call for it since Halloween / the Fall ended. However, as I was telling my friend, as I laid in bed listening to my husband snore ( it’s not a secret although he might not care for me to share it with the internet) I had an idea about how to use the orange thread before Halloween rolled back around. Citrus fruit! Specifically, make items that look like slices of an orange. Wouldn’t that be super cute? I thought so as I tried to fall asleep and I hoped I would remember when I woke up in the morning.

I did and the first thing I decided to experiment with is making another crochet ring. As you know I do love making crochet rings, I’ve made a Willow version, a Brittany and a heart in addition to my pumpkin ring mentioned earlier,  so this was very natural and simple to think of.  To make one of your own you’re going to need orange size 10 crochet thread, white size 10 crochet thread, a 2.25 mm crochet hook, and a needle that is big enough for you to weave the thread with. You may also want another color for the band for your ring, I used green this time in a departure from my heart and pumpkin rings.
Before you begin you might want to jump over and look at Needle Noodles’ tutorial on how to change colors in the round without making it look all icky. I must admit I’m not great at changing colors in the round and not making it look terrible, but this tutorial has helped a lot.

For the band I crocheted 25 sts and slip stitched the last st into the first to create a ring:

Orange crochet ring pattern by Divine Debris

Rows 1 – 4 or 5: (you can make the band as tall as you would like) ch 1, sc into each st around, slip st into the beginning sc to secure – 25 scs
For the orange:
Row 1: Create a magic circle: ch 1, sc six times into the circle, slip st into the first sc to secure- 6 scs
Row 2: Ch 1, sc twice into the same st as join and into each st around, slip st into the first sc to secure – 12 scs
Row 3: Ch 1, sc twice into the same st as join, sc into the next st, *sc twice into the next st, sc twice into the next st,* repeat from * to * until the end of the row, slip st into the first sc to secure – 18 scs
Change to white thread: Row 4: Ch 1, sc twice into the same st as join, sc once into the next 2 sts, *sc twice into the next st, sc once into the next 2 sts,* repeat from * to * the rest of the way around, slip st into the first sc to secure – 24 scs (fasten off with this color)
Change to orange thread: Row 5: Ch 1, sc once into the same st as join and into the next 2 sts, sc twice into the next st, * sc into the next 3 sts, sc twice into the next st,* repeat from * to * the rest of the way around, slip st into the first sc to secure – 30 scs (fasten off with this color)Orange crochet ring pattern by Divine Debris
*Note: You could just do a sc row around row 5 if you would like, this will make your final product look more round but it might make the edges curl a bit. Your choice.

Details:

I didn’t measure the white piece of thread I used before I addedOrange crochet ring pattern by Divine Debris the details on the ring, however I would say it’s was about 3″ – 4″, it’s better to have it too long than to have it too short. To create

the orange sections, so to speak, you want to start on the back side (the opposite side of the one that has been facing you as you’ve created your orange), bring your threaded needle through the first sc from the seam on row 3, then go through the center of the of the magic Orange crochet ring pattern by Divine Debriscircle, skip 2 sts on row 3 and draw your needle through the next st on row 3 and then through the center of the magic circle again. You’re going to

continue this pattern the rest of the way around your orange. You are going to want to pull the thread tight enough that it doesn’t sag but not so tight that it distorts your orange. Don’t Orange crochet ring pattern by Divine Debrisworry about them

moving because when you weave in the end from the magic circle it will hold the thread pieces in place in the center. When you get all the way around your orange you will come back through the same stitch you began in, the first one of row 3. Weave in your ends following this.

To secure the orange to the band I just used Fabri-Tac but you can sew them or use a glue you’re sure won’t change the color of the thread- I’ve had super glue change thread color before so I wouldn’t recommend it here.

So, tada! There you go. I hope you like this little ring. I’ve got a couple more citrus based ideas that I’m going to work up in the future and get back to you. You can add this pattern to your Ravelry queue/favorites here or Pin it here.

As always, take care and I will chat at you another day.

You can find this post linked up to Oombawka Design’s Link and Share Wednesday and Moogly and Petals to Picots Hookin’ on Hump Day.

Something in a Valentine style

Hello! How is your Friday going? Me? Oh, I’m just trying to get some stuff done but my

Heart ring pattern by Divine Debris

desire to stay in my jammers and watch Gilmore Girls re-runs is really strong. Ha. I guess it’s lucky that I finished my Valentine’s Day ring and took pictures of it before today. Planning, it’s great for those days where you don’t feel like doin’ much. 😀

So, I was inspired by the lovely pattern round-ups from lovely people, like Tanya at HodgePodge Crochet, to create something that would be fun to wear during Valentine’s Day. Also, I do love a fun ring. (Remember my pumpkin ring?)

Heart ring pattern by Divine Debris

So, for this ring you’ll need the same materials as the pumpkin ring:

A couple of colors of size 10 crochet thread and a 2.25 mm crochet hook (I used a Boye brand).
Again, for the band, I crocheted 24 chains and then did 5 rows of scs but if you need more or less chs/rows definitely adjust that.

For the heart I used PlanetJune‘s heart pattern in the medium size.

Using white, to get that memorable and awesome doily look (which always reminds me

Heart ring pattern by Divine Debris

of my younger years), start in the first sc of row two, sc & ch 1 in each st all the way around, slip st into the first sc when you’ve gone all the way around. It’s just that simple!

I then glued the heart to the band. The heart ends up being just over 1″ in height and 1.25″ at it’s widest. Ok, sure, it’s a bit big but it’s an attention getter, so go big or go home! Or you could do the small heart and a thinner band. That’s the fun thing about such a simple pattern, you can change it as you would like. You could probably make the band bigger, and a larger heart, and make a napkin ring. That’s much fancier than I get, but it’d look nice on a table for a Valentine’s Day dinner. Me? Oh, I think I’m going to grab my red and white threads and make some Valentine earrings. 😀 (If you would like to add this to your Ravelry queue or favorites you can do so here. Pin it here.)
Oh, and before I shuffle off and get some more coffee, I just wanted to introduce you to

Tabitha hat pattern by Divine Debris

my newest hat design, the Tabitha. The pattern comes with adult/teen and child directions and is wonderfully reversible. Also, and this is the best part at the moment, I’m doing a giveaway on my FB page. On Monday I will be using Rafflecopter to select 10 random winners who will get their own FREE copy of the Tabitha Hat pattern. If you don’t want to risk it and would like to get your pattern now, it’s on sale for $2.39 right now (this is a link to my website) and you can buy it for $2.39 on Craftsy if you’d prefer. Add it to your Ravelry queue or favorites here. Or pin it for later here. All in all, I really like this hat design and had a lot of fun makin’ the pattern. I’m working on a scarf version of this as well, I thinkin’ it’s going to include a long “traditional” scarf and a cowl.
Anyway, I hope you like the heart ring pattern, well it’s not so much a pattern as it is an adaptation of other things. 😀 Take care! I’m hoping I’ll stumble upon some motivation somewhere so I can get some of the things on my crafting list done. Until next time.

You can find this post linked to Hookin’ on Hump Day by Petals to Picots and Moogly and MadMadMakers Patterns and Tutorials.

Pumpkin times?

So… I’m not sure if you’ve noticed but pumpkin is everywhere this time of year. Coffees, doughnuts, candy, fingernails… all over! So, I thought I’d get in on the fun and make a new

Pumpkin ring pattern by Divine Debris

crochet ring featuring a pumpkin.

Using a Boye 2.25mm crochet hook and size  10 crochet thread:

Like the last ring pattern that I posted on here, I chained 24 but if you need to do more or less to fit your finger, do so. The size of the ring or stitches is not important.

Ring:

Row 1: Ch 24, slip st into first st to form a ring. *be careful not to turn the chain*

Row 2 – 6: Ch 1, sc into each st around, slip st into first st to secure – 24 scs

Fasten off, weave in ends.

I did the body of the ring in brown, but you can do it whatever color you would like.

Pumpkin ring pattern by Divine Debris

Pumpkin:

Row 1: Magic circle, ch 1, sc 6 times into the circle, slip st into the first st to secure – 6 scs

Row 2: Ch 1, sc twice into each st around, slip st into the first st to secure – 12 scs

Row 3: Ch 1, sc into first st, sc twice into next st, * sc into next st, sc twice into next st,* repeat from * to * the rest of the way around – 18 scs

Row 4: Ch 1, sc into first st, sc into next st, hdc twice into next st, dc into next st, dc into next st, dc twice into next st, hdc into next st, sc into next st, sc into next st, sc into next st, sc into next st, hdc twice into next st, dc into next st, dc into next st, dc twice into next st, hdc into next st, sc into next st, sc into last st – 22 sts

Fasten off. I left a long end and used it to sew the pumpkin to the ring. You can also glue the pumpkin to the ring, if you would like. Crafter’s choice.

Stem: Using the middle two scs on the top, sc into both sts. Turn, ch 1, sc a second row. Fasten off, weave in ends.

Ta da! What do you think? I think I’m going to make another one and add a jack-o-lantern face on it. Or maybe a ghost. An apple! Oh, the options are endless and could be really fun. I can’t wait to experiment.

You can find this post on Link and Share Wednesday {Party 61} by Oombawka Design

Also, the Willa Owl-Bat pattern is ready to download on my website. You can also pin it for later here.

Willa owl-bat in black and purple by Divine Debris

Until next time, friends!